RFID 860-960MHZ 18000 6BC Ultra High Frequency Tire Special Tag
Tire
patch- tag:
- RFID prod uct inf
- ormation: Tire patch RFID tag Ultra- high fr
- eque ncy RFI
|
Specification d escription |
Product model (orde r co de) |
T
|
Performa nce indicator s |
protocol
EPC c lass 1 | genera
| 18000-6C protocol
Operati ng fre | quency
|
| ency range 860-960 MHZ |
Read distance
0-2m Memory Have 96bits | EPC or
| 12bits user storag e space |
Read and write f unctions User d | ata in
| n be read and writ ten |
Uniqueness
T he fact ory-wr | itten t
| tion code is uniqu e to p revent | cloning
In stallation location Installed in t he inn | er side
|
Lab el size |
110mm long, 55mm wide, 3mm thick we | ight
|
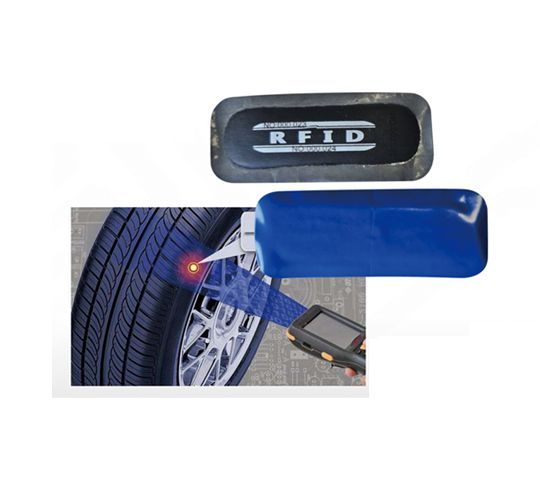
Br ief in troduc | tion: �8�5 860-960 MHz fr equency is suitable fo r inte | rnation
| ns. �8�5 The readi ng dist ance a | fter being installed on t he tire is 0~ 2m �8� | 5 The f
| ture can withstand the de format | ion of the tire's entire life cycle. �8�5 Aft er the | tire i
| d, it is installed in t he inn | er sidewall position. The �8�5 t ag has | 96bits
- user s
- torage space, complies with EPC class 1 gen
eration 2 or ISO 18000-6C protoco
l. �8�5 User data in the ta
g memory can be read and writt
en. �8�5 The identification c
ode written by the factory to the tag is unique to prevent cloning. Tag characteristics: 1.
The tire label is an ultra-hi
gh frequency RFID label, compli es with
ass 1, Generation 2 protocol or ISO 18000-
6C protocol. 2. The label can withstand the high temper
ature during tire refurbishment and is durab
le and can be used throughout
the tire life cycle. 3. Tire labels can
be used in truck tires that require multiple
refurbishments. 4. The label has exceed
ed actual road tests of
hundreds of thousands of kilom
eters, and there has been n
o potential defects in
the tires. Installation method: P
ermanently fixed to the
inner side wall of the tire by glue or
heating. The install
ation steps are as follows: 1.
Determine the general area wher
e the patch label is installed. 2. Clean the su
rface of the lining
- where the patch
- label is install ed. 3.
- Remove the mold p attern
- left after vulcanization of the
- surface of the inner lining laye r. 4. M
- ark the exact location of the
- patch tags installed. 5. The center of the label is 105~115mm away from t he toe
bead
. 6. Use vulcanized glue and make sure the solvent is dried. 7. Apply the patch label to the treated lining and apply some pressure to ensure full contact. 8. There are no bubbles under the patch label. 9. The entire perimeter of the patch label needs to be tightly attached to the tire. 10. Wait for the appropriate time to vulcanize the bonding system (depending on the temperature). Follow the steps of the diagram: 1. Spray cleaner in the calibrated area Use a spatula to remove dust from the surface Use a grinder to polish the calibration area smoothly Use a vacuum cleaner and a copper brush to remove the remaining polishing powder particles on the polishing surface. Apply the glue brush to the treated area, and apply glue to the gray glue surface of the patch label Apply glue and let it dry for 5 to 10 minutes (depending on the temperature) Tear off the blue packaging on the back of the patch label, do not touch the gray adhesive on the back with your hands and the treated tire surface. The patch label can be attached to the tire for at least 24 hours before it can be loaded to ensure complete sulfurization| Product Name | RFID 860-960MHZ 18000 6BC Ultra High Frequency Tire Special Tag | ||||||||||||||||||||||||
|---|---|---|---|---|---|---|---|---|---|---|---|---|---|---|---|---|---|---|---|---|---|---|---|---|---|
| SKU | UHFTYRE-TW | ||||||||||||||||||||||||
| Weight | 0.007000 | ||||||||||||||||||||||||
| Customizable | No | ||||||||||||||||||||||||
| With Built-in Battery | No | ||||||||||||||||||||||||
| Warranty | 1 Year Warranty | ||||||||||||||||||||||||
| Country Specific | Universal | ||||||||||||||||||||||||
| selling_potential | 3 | ||||||||||||||||||||||||
| Minimum Order Quantity | Yes | ||||||||||||||||||||||||
| Description | Tire patch
ass 1, Generation 2 protocol or ISO 18000-
bead . 6. Use vulcanized glue and make sure the solvent is dried. 7. Apply the patch label to the treated lining and apply some pressure to ensure full contact. 8. There are no bubbles under the patch label. 9. The entire perimeter of the patch label needs to be tightly attached to the tire. 10. Wait for the appropriate time to vulcanize the bonding system (depending on the temperature). Follow the steps of the diagram: 1. Spray cleaner in the calibrated area Use a spatula to remove dust from the surface Use a grinder to polish the calibration area smoothly Use a vacuum cleaner and a copper brush to remove the remaining polishing powder particles on the polishing surface. Apply the glue brush to the treated area, and apply glue to the gray glue surface of the patch label Apply glue and let it dry for 5 to 10 minutes (depending on the temperature) Tear off the blue packaging on the back of the patch label, do not touch the gray adhesive on the back with your hands and the treated tire surface. The patch label can be attached to the tire for at least 24 hours before it can be loaded to ensure complete sulfurization |
||||||||||||||||||||||||
| Condition | New | ||||||||||||||||||||||||
Still have a question? No worries.

-
 Multifunctional repair waterproof thickened Oxford, super large capacity, plastic hard bottom, four corners, electrician bag, shoulder bag, shoulder bagSpecial Price US$11.88 Regular Price US$13.20
 -
 Dahua surveillance camera 2 million to 8 million high-definition full-color night vision bolt plug-in poe outdoor cameraSpecial Price US$19.44 Regular Price US$21.60
 -
 HIKVISION English version DS-2CE16U1T-ITF 8 million 4K coaxial high-definition surveillance cameraSpecial Price US$16.20 Regular Price US$18.00
 -
 3goa portable spot welding machine handheld small DIY accessories 18650 mobile phone lithium battery nickel chip touch household full setSpecial Price US$34.13 Regular Price US$37.92
 -
 W1401 Temperature control 12V XH W1401 Smart Digital Temperature ControlSpecial Price US$2.59 Regular Price US$2.88
 -
 OE04 True A-C120 Traditional Chinese Fingerprint Attendance Machine Fingerprint Check-in Attendance Machine Fingerprint Machine USB Drive Upload and Download Data Color ScreenSpecial Price US$40.61 Regular Price US$45.12
 -
 Monitor 5 million SONY chip 5MP SONY IMX335 Indoor hemisphere Infrared camera UTC lightning protectionSpecial Price US$32.40 Regular Price US$36.00
 -
 Readable mobile phone screen CCD mask barcode scanner BF-20 dedicated for mobile phone vehiclesSpecial Price US$17.28 Regular Price US$19.20
 -
 Jiabo B227 Thermal barcode printer/label machine/bill machine-with editing softwareSpecial Price US$53.57 Regular Price US$59.52
